To implement Cloudflare’s Turnstile CAPTCHA in WordPress, follow these steps:
Step 1: Get Your Cloudflare Turnstile Site Key and Secret Key

- Go to the Cloudflare Turnstile Dashboard (you might need to sign up for Cloudflare if you haven’t already).
- Register your site and get the Site Key and Secret Key.
Step 2: Install and Configure a Plugin
There are several ways to integrate Turnstile into your WordPress site. The easiest is by using a plugin. Here’s how:
Option 1: Using a Dedicated Plugin (e.g., Simple Cloudflare Turnstile)
- Go to your WordPress Admin Dashboard.
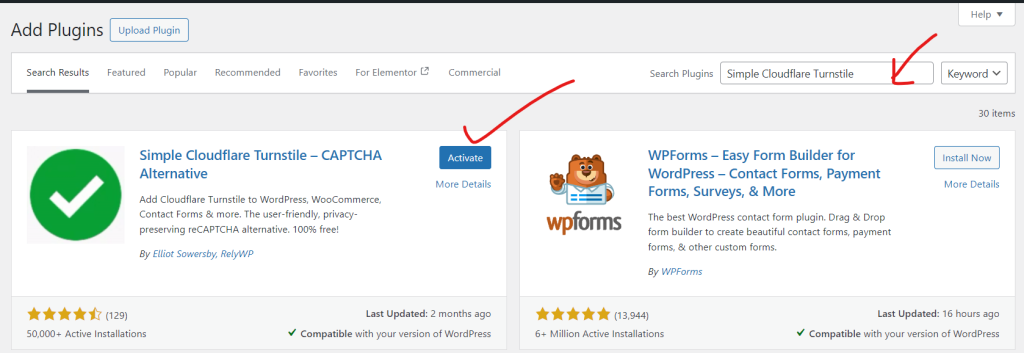
- Navigate to Plugins → Add New.
- Search for the Simple Cloudflare Turnstile plugin.
- Install and activate the plugin.

Option 2: Manual Integration with Code (for custom forms)
Add the following Turnstile API script in your WordPress theme’s header.php file:
Edit your WordPress theme (you can do this through the theme editor or by using FTP/SSH).
<script src="https://challenges.cloudflare.com/turnstile/v0/api.js" async defer></script>
In the form where you want to display Turnstile, add the following code inside the form’s <form> tags:
<div class="cf-turnstile" data-sitekey="YOUR_SITE_KEY"></div>
Replace "YOUR_SITE_KEY" with the actual Site Key from Cloudflare.
On the form submission handler (usually in the functions.php file or the form plugin’s PHP file), verify the Turnstile token. You will send the cf-turnstile-response token to Cloudflare for verification. Use a code snippet like this:
function verify_turnstile_token($token) {
    $secret = 'YOUR_SECRET_KEY';  // Replace with your Cloudflare secret key
    $response = wp_remote_post('https://challenges.cloudflare.com/turnstile/v0/siteverify', [
        'body' => [
            'secret' => $secret,
            'response' => $token,
        ],
    ]);

    $body = wp_remote_retrieve_body($response);
    $result = json_decode($body);

    return $result && $result->success;
}

// Use this in your form validation logic:
if (!empty($_POST['cf-turnstile-response'])) {
    $token = sanitize_text_field($_POST['cf-turnstile-response']);
    if (verify_turnstile_token($token)) {
        // Proceed with form submission
    } else {
        // Handle invalid Turnstile response
    }
} else {
    // Handle missing Turnstile response
}
This ensures Turnstile is verified on the backend, protecting against spam and bots.
Step 3: Test the Implementation
- After adding the Turnstile CAPTCHA, test the forms (e.g., login forms, contact forms) on your site.
- Check both successful and failed CAPTCHA verification scenarios.
Would you like help with any specific aspect of this implementation?
